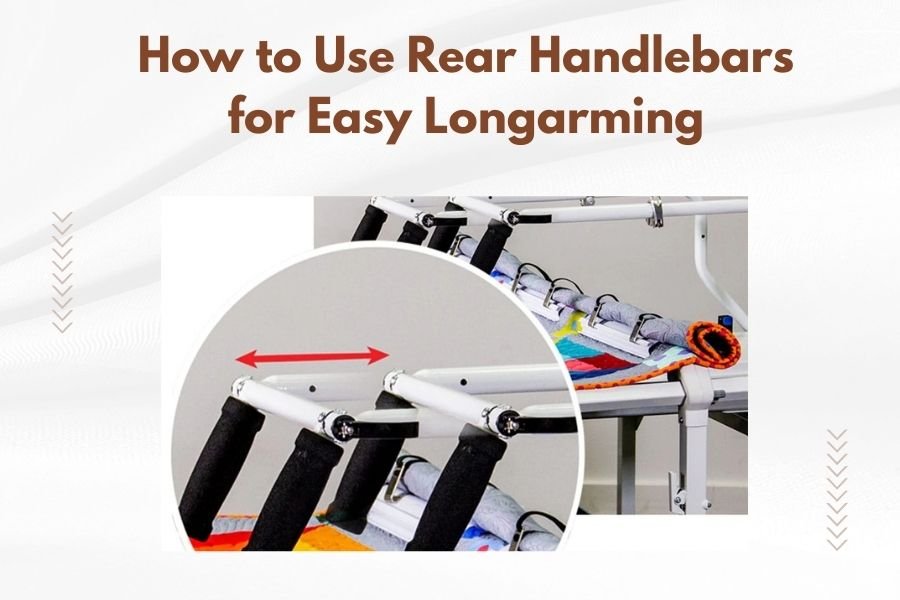
Rear handlebars on longarm quilting machines help you control fabric tension and guide quilt movement from the back of the machine. You grip these handles while moving the machine to create even stitches and maintain consistent quilting patterns.
Using rear handlebars for easy longarming requires proper hand positioning, smooth movements, and coordinated pushing and pulling motions that work with your front hand guidance.
What Are Rear Handlebars on Longarm Machines
Rear handlebars sit at the back of your longarm quilting machine. They look like bicycle handles or curved grips. You hold them while quilting to control the machine’s movement.
These handles connect to the machine carriage. When you push or pull them, the entire machine moves along the track system. Think of them as your steering wheel for quilting.
Most longarm machines come with adjustable rear handlebars. You can raise or lower them to match your height. Some quilters prefer them at chest level. Others like them higher or lower.
Why Rear Handlebars Matter for Quilting Success
Your quilting quality depends on smooth, controlled movements. Rear handlebars give you the stability you need for consistent stitching.
Without proper rear handle control, your stitches become uneven. Your patterns look wobbly. Your quilting speed suffers too.
I found that most quilting experts recommend using both front and rear controls together. The front handles guide direction. The rear handles provide stability and power.
Setting Up Your Rear Handlebars Correctly
Start by adjusting the handlebar height. Stand behind your machine in your normal quilting position. Your arms should hang naturally at your sides.
Raise the handles until they meet your hands without lifting your shoulders. Your elbows should bend slightly when gripping the handles.
Checking Your Stance and Position
Your feet should be shoulder-width apart. Stand about 12 inches from the back of the machine. This gives you room to move without stretching.
Keep your back straight. Avoid leaning forward or backward. Good posture prevents fatigue during long quilting sessions.
Grip Style and Hand Placement
Hold the handlebars like you’re riding a bicycle. Your grip should be firm but not tight. White knuckles mean you’re gripping too hard.
Place your thumbs on top of the handles. Wrap your fingers underneath. This gives you the best control for pushing and pulling motions.
Avoiding Common Grip Mistakes
Don’t death-grip the handles. Tight muscles create jerky movements. Your stitching will show every tense motion.
Avoid holding just the ends of the handles. Use the full grip area for better control.
Basic Rear Handlebar Techniques
Start with simple straight lines. Push the rear handles away from you to move the machine forward. Pull them toward you to bring the machine back.
Keep your movements slow and steady. Fast jerky motions create uneven stitches. Smooth is better than fast when you’re learning.
Coordinating Front and Rear Movements
Your front hands steer. Your rear hands provide the power. Think of driving a car where someone else controls the steering wheel.
When your front hands guide left, your rear hands should support that movement. Don’t fight between front and rear controls.
The Push-Pull Motion Explained
Pushing moves the needle away from you. Pulling brings it closer. Most quilting patterns need both motions.
Practice pushing for 6 inches, then pulling for 6 inches. Keep your speed consistent. This builds muscle memory for pattern work.
Building Smooth Motion Habits
Start each quilting session with warm-up exercises. Move the machine in large circles using only the rear handles.
Practice figure-eight patterns. These teach you to coordinate push-pull with side-to-side movements.
Working with Different Quilting Patterns
Straight-line quilting uses mainly push-pull motions. Your rear handles do most of the work here.
Curved patterns need gentler rear handle pressure. Let your front hands guide the curves while rear handles provide steady support.
Free-Motion Quilting with Rear Handles
Free-motion work requires light rear handle touch. You’re not pushing or pulling hard. You’re just supporting the machine’s movement.
Think of your rear hands as spotters in gymnastics. They’re there for support, not to control every movement.
Pantograph and Template Work
Following pantograph patterns needs consistent rear handle pressure. The template guides your direction. Your rear handles maintain steady speed.
Keep your rear handle movements smooth and even. Jerky motions will show up as irregular stitching on your quilt.
Managing Pattern Transitions
When changing directions in patterns, slow down your rear handle movements. Fast direction changes create tension problems.
Pause briefly at sharp corners. This gives your machine time to adjust before continuing the pattern.
Troubleshooting Common Rear Handlebar Issues
Uneven stitches often come from inconsistent rear handle speed. Practice maintaining steady pressure throughout your quilting.
If your machine feels hard to move, check your grip pressure. Too much tension in your hands transfers to the machine.
Dealing with Fatigue and Strain
Sore shoulders usually mean your handlebars are too high. Lower them until your shoulders relax naturally.
Back pain often comes from leaning over the machine. Stand upright and let the handlebars come to you.
Speed Control Problems
If you’re quilting too fast, focus on your rear handle movements. Slower rear motions automatically reduce your overall speed.
Inconsistent speed creates thread tension issues. Practice moving the rear handles at a steady rhythm.
Machine Resistance and Binding
If the machine feels stuck, don’t force it with the rear handles. Check your quilt sandwich for bunching or caught fabric.
Sometimes the track needs cleaning or lubrication. A smooth-running machine requires less rear handle effort.
Advanced Rear Handlebar Strategies
Once you master basic movements, try varying your rear handle pressure for different effects. Light pressure creates delicate stitching. Firm pressure works better for bold patterns.
Advanced quilters use rear handles to control thread tension indirectly. Smooth consistent movements help maintain even thread tension throughout the quilt.
Developing Your Personal Style
Every quilter develops their own rear handle technique. Some prefer short, controlled movements. Others like long, flowing motions.
Experiment with different approaches on practice fabric. Find what feels comfortable and gives you the best stitch quality.
Building Speed and Confidence
Speed comes naturally as your rear handle technique improves. Don’t rush the learning process.
Practice the same pattern repeatedly until your rear handle movements become automatic. Muscle memory is your best friend in quilting.
Professional-Level Techniques
Professional quilters often use micro-movements with their rear handles. These tiny adjustments create incredibly precise stitching.
Watch your stitching line while quilting. Your rear handles should respond immediately to any deviations you see.
Maintenance and Care for Rear Handlebars
Keep your handlebars clean and dry. Oil from your hands can make them slippery over time.
Check the adjustment mechanisms regularly. Loose handlebars affect your quilting control and can be dangerous.
When to Replace or Upgrade
Worn handlebars feel loose or wobbly in your grip. Replace them if the adjustment mechanism doesn’t hold position.
Some aftermarket handlebars offer better ergonomics than factory versions. Consider upgrading if you quilt frequently.
Conclusion
Mastering rear handlebars transforms your longarm quilting experience. These simple controls give you the stability and precision needed for professional-quality results. Start with proper setup and basic techniques. Practice smooth, controlled movements until they become second nature. Remember that your rear handles work best when they support your front-hand guidance rather than fighting against it. With consistent practice and proper technique, you’ll discover that rear handlebars make longarming easier, more comfortable, and much more enjoyable. Your quilts will show the difference in every even stitch and smooth pattern line.
How tight should I grip the rear handlebars while quilting?
Use a firm but relaxed grip, similar to holding a bicycle handlebar during a casual ride. Your knuckles shouldn’t be white, and your forearms shouldn’t feel tense. A death grip creates jerky movements that show up in your stitching.
Can I quilt effectively using only the rear handlebars without front controls?
While possible for simple straight-line quilting, using rear handles alone limits your precision and pattern options. The front handles provide directional control while rear handles supply power and stability. Both work together for best results.
What’s the ideal height setting for rear handlebars on different quilter heights?
Set handlebars so your elbows bend slightly when gripping them naturally. For average height quilters (5’4″ to 5’8″), this usually means chest-high positioning. Taller quilters may prefer them slightly higher, shorter quilters slightly lower.
Why does my machine feel harder to move when using the rear handlebars?
This usually indicates either too much grip tension in your hands, a machine that needs lubrication, or handlebars set at the wrong height. Check your stance, relax your grip, and ensure your machine tracks are clean and properly maintained.
How do I coordinate rear handlebar speed with my quilting machine’s motor speed?
Your rear handlebar movement speed should match your machine’s stitching rhythm. Practice moving the handles at a consistent pace that allows the machine to form even stitches. Start slowly and gradually increase speed as your coordination improves.