The take-up lever controls thread tension and feeds thread to your needle during each stitch cycle on your quilting machine.
Without a properly functioning take-up lever, you’ll get skipped stitches, thread breaks, and uneven seam quality that ruins your quilting projects.
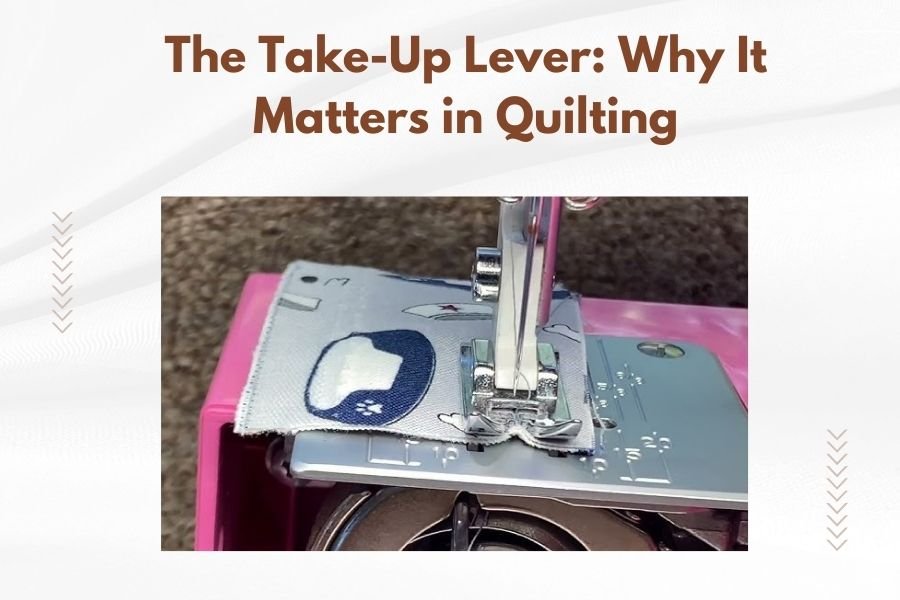
What Is the Take-Up Lever on Your Quilting Machine
Your take-up lever looks like a small metal arm that moves up and down on the front of your sewing machine. It sits near the tension dials and thread guides. This little component does big work behind the scenes.
Think of it like a conductor directing an orchestra. The take-up lever coordinates the precise timing between your needle, bobbin, and thread feed. When your needle goes down into the fabric, the lever releases thread. When the needle comes back up, the lever pulls the thread tight to form a proper stitch.
How the Take-Up Lever Works During Quilting
Every time you make a stitch, your take-up lever goes through a specific cycle. It moves in sync with your needle’s up-and-down motion. Here’s what happens in simple terms.
As your needle pushes down through the quilt layers, the take-up lever moves down too. This releases just enough thread for the needle to reach the bottom of its stroke. Then the magic happens underneath your quilt.
The Underground Stitch Formation
While your needle is down, it catches the bobbin thread and forms a loop. Your take-up lever waits patiently during this step. When your needle starts coming back up, the lever springs into action.
The lever pulls up sharply, drawing the top thread tight. This action locks the top and bobbin threads together. Without this pull, your stitches would be loose and sloppy.
Why Thread Tension Depends on Your Take-Up Lever
Your take-up lever directly controls how tight or loose your stitches look. When the lever pulls thread at the right moment with the right force, you get perfect tension. When something goes wrong with the lever, your quilting suffers.
I found that most quilting problems trace back to take-up lever issues. The lever might be dirty, bent, or poorly threaded. Sometimes quilters don’t thread through the lever at all by accident.
Common Take-Up Lever Problems That Ruin Quilts
You’ll notice take-up lever problems right away in your stitching. Your quilting machine will start acting up in predictable ways. Let me walk you through the most common issues.
Skipped Stitches From Timing Issues
When your take-up lever timing is off, you get gaps in your quilting lines. The needle and lever aren’t working together properly. Your thread doesn’t get pulled tight when it should.
This happens more often with older machines or after heavy use. The internal timing mechanism can shift slightly. You’ll need a professional tune-up to fix timing problems.
Thread Breaks at the Worst Moments
A damaged take-up lever can have rough edges or burrs. These tiny imperfections catch your thread as it moves through the lever. The thread weakens and snaps, usually right in the middle of a complex quilting pattern.
Check your take-up lever regularly for damage. Run your finger gently along the thread path. You shouldn’t feel any rough spots or sharp edges.
Loose Stitches That Won’t Hold
Sometimes your take-up lever moves but doesn’t pull hard enough. This creates loose, floppy stitches that look unprofessional. Your quilt layers might shift or pucker.
This often happens when the lever is dirty or needs lubrication. Thread lint builds up in the mechanism over time. Regular cleaning prevents this problem.
Uneven Stitch Length Problems
Your take-up lever should pull the same amount of thread for each stitch. When it doesn’t, some stitches look longer than others. Your quilting lines become wavy and inconsistent.
Bent take-up levers cause this issue. The lever can’t complete its full range of motion. It pulls different amounts of thread randomly.
How to Thread Your Take-Up Lever Correctly
Many quilting problems come from incorrect threading. Your thread must pass through the take-up lever in a specific way. Missing this step ruins everything that comes after.
Start with your needle in the highest position. This gives you the most room to work and ensures proper thread path. Your take-up lever should be at its highest point too.
The Proper Threading Sequence
Follow your thread from the spool to the needle. It should pass through several guides before reaching the take-up lever. Each guide serves a purpose in controlling thread flow.
The take-up lever usually has a small hole or slot. Thread your machine with the presser foot up. This opens the tension discs and makes threading easier.
Double-Check These Threading Points
Make sure your thread catches the take-up lever from front to back. Some machines require threading from back to front. Check your manual for the exact direction.
Pull gently on your thread after threading. You should feel slight resistance from the tension system. If the thread pulls too easily, you missed the take-up lever or tension discs.
Threading Mistakes That Cause Big Problems
The most common mistake is skipping the take-up lever completely. Your thread might look properly threaded from a distance. But if it doesn’t go through the lever, nothing works right.
Another mistake is threading with the presser foot down. This closes the tension system and makes proper threading impossible. Always lift that presser foot first.
Maintaining Your Take-Up Lever for Best Results
Your take-up lever needs regular attention to keep working smoothly. Most maintenance tasks are simple and take just a few minutes. But they make a huge difference in your quilting quality.
Daily Cleaning and Inspection
Before each quilting session, look at your take-up lever closely. Brush away any visible lint or thread bits. Use a small brush or compressed air to clean hard-to-reach spots.
Pay attention to the thread path through the lever. Lint loves to collect in these tight spaces. A clean thread path prevents tension problems and thread breaks.
Weekly Deep Cleaning Steps
Once a week, remove your needle and unthread your machine completely. This lets you clean the take-up lever area thoroughly. Use a soft cloth dampened with sewing machine oil.
Wipe down all visible parts of the take-up lever mechanism. Don’t use harsh chemicals or excessive oil. A little goes a long way with sewing machine parts.
When to Lubricate Moving Parts
Your take-up lever has several moving joints that need occasional lubrication. Most manufacturers recommend oiling these points every few months. Heavy quilters might need more frequent oiling.
Use only sewing machine oil for this job. Other oils can gum up and attract dirt. Apply tiny drops to pivot points and moving joints.
Signs Your Take-Up Lever Needs Professional Help
Sometimes cleaning and basic maintenance aren’t enough. Watch for these warning signs that indicate bigger problems.
- Take-up lever moves sluggishly or sticks in position
- Visible bends or cracks in the lever arm
- Grinding or clicking noises during operation
- Persistent timing issues despite proper threading
Troubleshooting Take-Up Lever Issues
When your take-up lever acts up, don’t panic. Most problems have straightforward solutions. Work through these troubleshooting steps methodically.
Quick Fixes for Common Problems
Start with the simplest solutions first. Rethread your entire machine, making sure to catch the take-up lever properly. This fixes about 70% of quilting problems right away.
Check your needle next. A bent, dull, or wrong-size needle can make your take-up lever work harder than necessary. Replace the needle if you have any doubts.
Adjusting Thread Tension Settings
Your take-up lever works with your tension system. If tension is too tight, the lever struggles to pull thread. Too loose, and stitches don’t lock properly.
Start with your machine’s recommended tension setting. Make small adjustments and test on scraps. Write down settings that work well for future reference.
Advanced Troubleshooting Techniques
If basic fixes don’t work, dig deeper. Remove your needle plate and clean out any lint or debris. Sometimes thread bits get stuck in places you can’t normally see.
Check your bobbin case and bobbin thread too. Problems “downstairs” can make your take-up lever work incorrectly. Everything in your machine is connected.
| Problem | Likely Cause | Quick Fix |
|---|---|---|
| Skipped stitches | Wrong needle or threading error | Replace needle, rethread machine |
| Thread breaks | Rough take-up lever or high tension | Clean lever, reduce tension |
| Loose stitches | Missed take-up lever or low tension | Rethread properly, increase tension |
| Uneven stitches | Damaged lever or timing issue | Professional service needed |
Take-Up Lever Differences Between Machine Types
Not all quilting machines have the same take-up lever design. Understanding your specific machine helps you maintain and troubleshoot more effectively.
Mechanical vs Computerized Machine Levers
Mechanical machines have simple, visible take-up levers. You can see exactly how they move and where problems might occur. These levers are usually easy to clean and maintain.
Computerized machines often hide the take-up lever inside the case. The mechanism works the same way but requires different maintenance approaches. You might need to remove panels to access everything.
Long-Arm Quilting Machine Considerations
Long-arm machines have more robust take-up lever systems. They handle heavier threads and work at higher speeds. The basic principles remain the same, but everything is built stronger.
These machines often have adjustment screws for fine-tuning take-up lever action. Don’t adjust these settings unless you know what you’re doing. Small changes make big differences.
Upgrading and Replacement Options
Sometimes your take-up lever reaches the end of its useful life. Age, wear, or accidents can damage the mechanism beyond simple repair. Knowing your options helps you make smart decisions.
When Replacement Makes Sense
Consider replacing your take-up lever if cleaning and professional service don’t solve persistent problems. Replacement parts are available for most machines, though older models can be challenging.
Weigh replacement costs against your machine’s overall value. Sometimes investing in a new machine makes more financial sense than expensive repairs.
Professional Installation vs DIY
Take-up lever replacement usually requires professional installation. The timing must be set precisely for proper operation. This isn’t a job for casual DIY repairs.
A qualified technician has the tools and knowledge to install your new lever correctly. They can also check other components that might need attention.
Conclusion
Your take-up lever might be small, but it plays a huge role in quilting success. This hardworking component controls thread tension, stitch formation, and overall quilting quality. When it works properly, you get beautiful, consistent stitches. When problems develop, your entire project suffers.
Regular maintenance keeps your take-up lever functioning smoothly for years. Simple cleaning, proper threading, and occasional lubrication prevent most problems before they start. When issues do arise, systematic troubleshooting usually provides quick solutions.
Remember that your take-up lever works as part of a larger system. Everything from your needle choice to thread quality affects how well the lever performs. Pay attention to this small but mighty component, and it will serve you well through countless quilting adventures.
Why does my thread keep breaking at the take-up lever?
Thread breaks at the take-up lever usually indicate rough edges, burrs, or excessive tension. Clean the lever thoroughly and check for damage. You might need to reduce your tension settings or switch to higher-quality thread that can handle the stress better.
Can I quilt without threading the take-up lever?
No, you cannot achieve proper stitches without threading through the take-up lever. The lever is essential for controlling thread tension and forming locks between your top and bobbin threads. Skipping the lever results in loose, uneven, or skipped stitches.
How often should I clean my take-up lever area?
Clean your take-up lever area daily if you quilt regularly, focusing on removing visible lint and thread debris. Perform deeper cleaning weekly by unthreading completely and wiping down all accessible parts with a slightly oiled cloth.
What causes my take-up lever to stick or move slowly?
A sluggish take-up lever typically needs cleaning and lubrication. Lint buildup, old oil that has thickened, or lack of proper lubrication causes sticky movement. Clean thoroughly and apply small amounts of sewing machine oil to pivot points.
Is it normal for the take-up lever to make noise while quilting?
Your take-up lever should operate quietly during normal sewing. Clicking, grinding, or squeaking noises indicate problems like worn parts, inadequate lubrication, or mechanical damage that needs professional attention before continuing to quilt.